
Are you tired of your unvarnished hardwood floors looking dull and worn out? Do you want to know how to make them look shiny and new again? Look no further than floor waxing! By using a dust mop to clean the surface before applying the polyurethane-based flooring system, your floors will be protected and have a long-lasting shine.
Floor waxing is an essential part of maintaining the appearance and longevity of flooring systems, including wood floors and resilient hard floors. A proper floor care program involves restorative floor care, which includes stripping old floor finish, applying a floor sealer such as polyurethane, and then multiple coats of floor finish or wax to restore the shine and durability of the flooring. Additionally, proper cleaning procedures must be followed to ensure the longevity of the flooring.
Choosing the right floor pad for the job is crucial in achieving the desired level of gloss and protection for hardwood flooring or other types of flooring. By selecting the correct pad, you can ensure that your floors are protected from damage while also providing a beautiful shine. It is important to note that when using a polyurethane product, proper cleaning procedures should be followed to avoid any damage to the floors. An auto scrubber can also be used in conjunction with the correct pad to ensure a thorough and efficient cleaning process.
Whether you’re looking to revitalize a room in your home or maintain a high-traffic commercial flooring system, understanding how to wax floors can save you time and money in the long run. With just a few simple steps, using an auto scrubber and polyurethane, you can transform any section of your property into a shining masterpiece. To start, apply stripping solution to remove any old wax buildup before proceeding with the waxing process.
So why wait? Let’s dive into everything you need to know about how to wax floors with an easy flooring system and finishes and start enjoying beautiful, shiny floors today!
Benefits of Waxing Your Floors
Waxing your floors using an auto scrubber is an essential part of maintaining the appearance and longevity of your flooring. Not only does it enhance the natural shine of your floors, but it also provides a layer of protection against scratches and stains. Applying polyurethane finishes can further protect your floors from wear and tear, while oil-based products can help nourish and revitalize the wood. In this article, we’ll explore some of the benefits of waxing your floors with these additional techniques.
Protects Floors from Scratches and Stains
One of the pros of waxing your floors is that it protects them from scratches and stains. As you walk on your floors, dirt, oil, and debris can become embedded in the surface, causing scratches over time. Wax acts as a barrier between the surface of your floor and any dirt or debris that may come into contact with it. This barrier prevents any damage to the underlying polyurethane material, keeping your floors looking new for longer. Additionally, using an auto scrubber to apply the wax can ensure a more even application and better protection for your floors.
Waxing helps prevent stains from setting into your wood floors and resilient hard floors. If you spill something on an un-waxed floor, it can seep into the pores of the polyurethane material, making it difficult to remove. A layer of wax seals off these pores, preventing moisture and spills from penetrating deep into the material.
Enhances Natural Shine
Another benefit of waxing your floors is that it enhances their natural shine. Over time, exposure to sunlight and foot traffic can cause wood flooring materials to lose their luster. Applying a coat of shellac or polyurethane after waxing can further protect the surface from moisture and restore its shine by filling in any small cracks or imperfections on the surface.
Wax also enhances the shine of wood floors and resilient hard floors, making them appear brighter and more lustrous. Additionally, hardwood floor finishes like polyurethane can be applied over waxed surfaces to provide extra protection and durability. The reflective properties of wax also improve the appearance of rooms with limited natural light sources.
Increases Durability
Waxing, along with applying a polyurethane coating, increases durability and provides an additional protective layer to flooring materials such as hardwood or tile. According to recent research, this step helps reduce wear and tear caused by foot traffic or furniture movement. To maintain the protective layer, it is recommended to use a stripping solution before reapplying the wax and polyurethane coating.
In addition to protecting against physical damage, wax also helps prevent moisture damage caused by spills or humidity levels in high-moisture areas like bathrooms or kitchens. This protection helps extend the life of your resilient hard floors, wood floors, or polyurethane-coated floors, saving you money in the long run. To maintain this protection, it’s important to use a stripping solution specifically designed for waxed floors.
Reduces Need for Frequent Cleaning
Waxed wood floors are easier to clean and maintain than un-waxed floors. The protective layer of wax or polyurethane prevents dirt and debris from penetrating deep into the material, making it easier to sweep or vacuum up. To maintain the finish, it is important to avoid using stripping solutions that may damage the protective layer.
Spills on wood floors coated with polyurethane finish can be easily wiped away with a damp cloth, without fear of staining or damaging the underlying material. This reduced need for frequent cleaning saves time and effort in maintaining your floors, and eliminates the use of harmful stripping solutions.
Adds Slip Resistance for Safety
Finally, applying a finish and waxing your floors adds an extra layer of slip resistance that can help prevent accidents in high-traffic areas like hallways or entryways. Before waxing, make sure to strip the old finish using a stripping solution as the first step. The wax creates a slightly tacky surface that provides additional traction underfoot, reducing the risk of slips and falls.
This added safety benefit is especially important for businesses expecting to have young children or elderly individuals who may be more prone to accidents and entities with hard floors. Restorative floor care is essential for maintaining these entities’ rights and ensuring all occupants’ safety.
Types of Floors Suitable for Waxing

Waxing wood floors is a great way to protect them from scratches and stains, as well as enhance their natural beauty. However, not all wood floors are suitable for waxing. Before applying wax, it is important to strip the old finish using a stripping solution to ensure the new wax adheres properly. Make sure to also respect the rights of your landlord or homeowner association before making any changes to the flooring.
Hardwood Floors
Hardwood floors are the most popular type of flooring for waxing. They have a natural beauty that can be enhanced by waxing. The process involves applying a layer of wax to the surface of the floor, which creates a protective barrier against scratches and stains. To maintain its beauty, it’s important to use a stripping solution before applying a new layer of wax. This ensures that the old finish is removed, allowing the new finish to adhere properly. It’s also important to note that the images of hardwood floors with a fresh coat of wax are truly stunning. Don’t forget that by waxing your hardwood floors, you are protecting your rights as a homeowner to keep your property looking its best.
Different types of hardwood floor finishes may require different waxing methods. If you have an oil-based finish on your hardwood floor, you should use a paste wax. On the other hand, if you have a water-based finish, you should use a liquid or spray-on wax. To properly apply the wax, it’s important to first strip the old wax using a stripping solution. You can find step-by-step instructions on the wikihow website, along with helpful images. Remember to respect the rights of the original content creators when using their material.
It’s important to note that not all hardwood floors need to be waxed. Some newer finishes do not require any additional protection beyond regular cleaning and maintenance. However, if you want to strip the old wax off of your floors, you have the rights to do so. Additionally, make sure the text content you are reading is up-to-date and accurate, and consider looking at images of properly maintained hardwood floors for reference.
Other Hard Floors
While hardwood floors are the most common type of flooring for waxing, other hard floors such as concrete and tile can also be waxed. Waxing these surfaces can provide an extra layer of protection against wear and tear. Stripping the old wax is necessary before applying a new finish. For a better understanding, images can be found online. All rights reserved.
It’s crucial to ensure that your floors are properly sealed with a floor sealer or hardwood floor finishes before applying any restorative floor care. If they are not properly sealed, moisture can seep into the pores of the concrete or hardwood and cause damage over time. Additionally, using a floor pad can help to maintain the quality of your floors and prevent scratches or other damage.
With tile floors, the first step in maintenance is stripping the old wax or polish before applying a high-quality floor finish. This will ensure that your tile floor stays looking great for years to come. Don’t forget to exercise your rights as a consumer by checking for images of the finished product before making a purchase.
Tools and Materials Required for Floor Waxing
Having the right tools and materials is essential for achieving a successful job. It is your rights as a worker to have access to proper equipment. To learn more about the necessary equipment for different types of jobs, you can visit the wikihow website. Additionally, it is important to have text content that provides clear instructions on how to use the tools. For instance, if you are using a floor pad, make sure to follow the instructions carefully to ensure optimal results.
Essential Tools for Floor Waxing
The following tools are essential for floor waxing:
Floor machine: A floor machine is a heavy-duty device that can be rented from hardware stores or purchased. It’s used to strip old wax off floors and apply new coats of wax.
Mop: A mop is used to apply the wax onto the floor. Make sure to use a clean mop head each time you apply a new coat of wax.
Mop bucket: A mop bucket is used to hold water and cleaning solution. It’s also where you’ll rinse your mop after each application of wax.
Trash bag: A trash bag will come in handy when disposing of old wax strips.
Materials Required for Floor Waxing
The following materials are required for floor waxing:
Floor stripper: This chemical solution is applied to floors before using the floor machine to strip off old layers of wax.
Urethane: Urethane provides an added layer of protection on top of your newly applied coat(s) of wax. It’s typically applied with a clean cloth after allowing the last coat of wax to dry completely.
Wood/cloth: These items are used as applicators when applying urethane onto floors.
Garbage bag/trash can liner: These bags will come in handy when disposing of any waste generated during the process.
It’s important to note that while these tools and materials are necessary for cleaning, maintaining a hardwood floor requires additional items. You can refer to images on wikiHow for step-by-step instructions on how to properly care for your hardwood floor. Also, ensure the appropriate mops and trash bags for your specific situation.
Step-by-Step Guide to Preparing the Floor for Waxing
Clear the floor of any furniture or objects
Before starting the waxing process, it’s essential to clear the floor of any furniture or objects that may obstruct your way. This includes chairs, tables, rugs, and anything that might get in the way while you’re cleaning. If you don’t have enough space to move everything out of the room, try pushing them towards one side so that you can work on the other side first. For a step-by-step guide on waxing floors, check out Wikihow’s article with images for a better understanding. Version 4 of the article has all the latest updates.
Sweep and vacuum the floor to remove debris
Step 4: Once you’ve cleared out all furniture and objects from the room, it’s time to sweep and vacuum thoroughly. Use a broom or dust mop to remove any loose dirt and debris from the floor surface. Pay close attention to corners and edges where dirt tends to accumulate. After sweeping, use a vacuum cleaner with a hard-floor attachment to suck up any remaining dirt particles. For more detailed instructions with images, check out the wikiHow article on cleaning floors.
Use a cleaning solution to remove any dirt or stains
Step up your floor cleaning game with the help of an image-guided tutorial on WikiHow. After removing all debris from your floor surface, follow the step-by-step guide to tackle stubborn stains or grime spots using a cleaning solution. There are many different types of cleaning solutions available in stores today designed specifically for floors. Choose one that is suitable for your type of flooring material.
When following the steps for cleaning your hardwood floor, make sure to use the recommended cleaning solution and follow its instructions carefully. Dilute the solution with water in the recommended proportions before application. Apply this mixture over small sections at a time using a clean mop or sponge. For a better understanding, refer to the accompanying image for guidance.
Rinse the floor thoroughly with clean water
After applying your cleaning solution over every inch of your flooring surface, rinse it off entirely with clean water using another mop soaked in plain water. Be sure not to leave behind any soapy residue as this will interfere with wax adhesion later on. For a visual guide on how to properly rinse your floors, check out the image provided on WikiHow.
Allow the floor to dry completely before waxing
The final step before waxing is ensuring that your flooring has dried completely after rinsing. Depending on the size of your room and ventilation, this can take anywhere from an hour to a few hours. It’s best to leave it overnight to dry completely. To help you visualize the process, you can refer to the image provided by wikiHow.
Once your flooring is entirely dry, follow step-by-step instructions with the help of images on WikiHow to start waxing!
How to Strip Old Wax from Your Floors
If you want to know how to strip old wax buildup from your floors, wikiHow has some helpful steps. Over time, wax can accumulate on floors and make them look dull. Stripping the old wax off will reveal a clean surface that’s ready for a new coat of wax or polish. Here are the step-by-step instructions with an image to guide you on how to strip old wax from your floors.
Get a Wax Stripper
The first step in stripping old wax, according to wikiHow, is to use a good quality wax stripper. There are many different types of strippers available, so be sure to choose one that’s designed for the type of flooring you have. You can find strippers that work well on hardwood, tile, vinyl, and other types of flooring. For added convenience, consider looking up an image of the product before purchasing.
Apply a Floor Stripping Solution
Step up your floor cleaning game with this wikiHow guide! Once you’ve applied the stripper, follow the next step by allowing it to sit for 10-15 minutes. Then, use a floor stripping solution to remove the old wax and other finishes from your floors. For a more detailed visual guide, check out the image below.
To apply the solution, follow the step-by-step instructions on WikiHow v4 and mix it according to the manufacturer’s instructions. Then, pour it onto your floors and use a scrub brush or floor machine with an abrasive pad attachment to work the solution into your floors. Be sure to work in small sections at a time so that you can keep track of where you’ve already cleaned. For a better understanding, refer to the image provided on WikiHow v4.
Use a Stripper
Allow the stripping solution to sit for several minutes before using a stripper tool or machine with an abrasive pad attachment to remove all traces of old wax from your floors. This process may take some time depending on how much buildup there is on your floors. Refer to the image provided in version 4 (v4) for visual guidance.
Be sure not to rush this step as leaving any traces of old wax on your floors will interfere with the new wax adhering properly. Once you’ve removed all traces of old wax, rinse your floors thoroughly with clean water and allow them to dry completely before applying a new coat of wax. For more detailed instructions, you can refer to the wikihow article on floor waxing. You may also find helpful images in the article to guide you through the process. This method is based on the v4 version of the wikihow guide.
Techniques for Applying Wax on Your Floors
Waxing your floors is an essential part of maintaining the beauty and durability of your flooring. If you are new to this task, it can be daunting. However, with the help of wikiHow, you can follow these simple steps to apply wax on your floors effectively. Step 1: Gather all the necessary materials. Step 2: Clear the floor of any debris and dirt. Step 3: Apply the wax in a thin layer using a clean mop. Step 4: Wait for the wax to dry completely. Step 5: Buff the surface with a cloth or buffing machine.
Use a Wax Applicator Mop for Even Application of Wax Coating
One way to ensure even application of wax coating is by using a wax applicator mop. This type of mop has a thick pad that holds the wax and distributes it evenly across the floor. To use this mop, follow these steps on wikiHow: pour some wax onto the floor and spread it out with the mop in long strokes, going with the grain of the wood or tile. For a visual guide, refer to the image provided in version 4 of the article.
Using a wax applicator mop on your hardwood floor ensures that you don’t miss any spots and helps you avoid over-applying or under-applying wax. It also saves time since you don’t have to bend down to apply the wax manually. This step is recommended by WikiHow’s v4 guide on hardwood floor maintenance.
Apply Paste Wax with a Clean Mop and Work in Small Areas
Paste wax is another option for protecting your floors from scratches, scuffs, and stains. It’s easy to apply but requires more elbow grease than liquid wax. To apply paste wax, follow the step-by-step guide on WikiHow with the help of an image for better understanding. This method is known as the V4 technique and is highly effective in maintaining the shine of your floors. Use a clean mop or rag and work in small areas.
Start at one corner of the hardwood floor and apply a thin layer of paste wax to an area no larger than 2-3 square feet, following the step-by-step guide on Wikihow. Spread it out evenly with circular motions until you cover all visible areas without leaving any clumps behind. This is a v4 version of the process.
Repeat this hardwood floor protection process until you cover all areas that need safeguarding. Let it dry for about 30 minutes before buffing off excess residue with a clean cloth or buffer machine. For a step-by-step guide, check out WikiHow’s article with an accompanying image.
Use a Flat Wax Applicator for Liquid Wax on Hardwood Floor Finish
If you’re looking for a step-by-step guide on how to apply liquid wax to your hardwood flooring, check out Wikihow’s article on “How to Wax Hardwood Floors.” They provide detailed instructions and even include images to help you along the way. Using a flat wax applicator with a soft pad attached to the bottom, apply the liquid wax for long-lasting protection. This method is known as V4 and is highly recommended for its ability to penetrate deep into the wood.
Step 4: Pour some wax onto the floor and spread it out with the applicator in long strokes, going with the grain of the wood. Work in small areas to ensure even application and avoid leaving clumps behind. For a visual guide, check out the images on WikiHow.
Step 1: Clean your hardwood floor thoroughly before applying wax. Follow the steps outlined on wikiHow for the best results. Step 2: Apply a thin layer of wax to your hardwood floor using a flat wax applicator. Refer to the image on wikiHow for guidance. Step 3: Let the wax dry for about 30 minutes before buffing off excess residue with a clean cloth or buffer machine. By following these steps, you can achieve an even finish without streaks or smears on your beautiful hardwood floor.
Protect Baseboards and Polyurethane by Using Pads Under the Wax Applicator
When applying wax on your floors, it’s essential to protect your baseboards and polyurethane from getting damaged by accidental spills or splatters. One step you can take, as shown in the wikiHow image v4, is to use pads under the wax applicator.
These pads are made of absorbent material that catches any drips or spills before they reach your walls or furniture. They also provide extra cushioning for your hands while you work, reducing fatigue and strain on your joints. If you’re working on a hardwood floor, these pads will protect it from scratches and scuffs. You can find an image of these pads on wikiHow to help you visualize how they can be used. Make sure to use them at every step of your project for maximum protection and comfort.
To use these pads, follow the step-by-step guide on wikiHow with the help of an instructional image. Simply slide them under the wax applicator before starting to apply wax. Make sure they cover all visible areas around the edges of your flooring to prevent any damage from occurring. This method is recommended for v4 flooring.
Tips for Achieving a Perfectly Smooth Finish
Achieving a perfectly smooth finish on your floors after waxing can be challenging, but it’s not impossible. Here are the steps from wikiHow to help you get the job done right. Step 1: Gather all necessary materials and tools. Step 2: Sweep and mop the floor thoroughly. Step 3: Apply the wax evenly using a clean cloth or mop. Step 4: Allow the wax to dry completely before buffing. Step 5: Use a buffer machine to buff the waxed floor. Step 6: Check for any missed spots and reapply wax if necessary. Step 7: Finish by adding an image
Apply Thin Coats of Wax for a Smoother Finish
Less is more when applying wax to achieve a smooth finish. Follow these steps from WikiHow to ensure best results: apply thin coats, as shown in the image, to avoid uneven surfaces. Remember to let each coat dry before applying the next one.
Use a Clean Buffing Pad to Avoid Scratches on the Surface
Using a clean buffing pad is an essential step when waxing your floors according to wikiHow. A dirty or worn-out pad can scratch the surface and ruin the finish. Make sure you use a high-quality pad that is specifically designed for buffing and apply even pressure while working in small sections. For a visual guide, refer to the accompanying image.
Pro Tip: Apply Additional Coats of Wax for Unvarnished Hardwood Floors
Unvarnished hardwood floors require extra attention. Applying additional coats of wax will help protect the wood and give it an added shine. Be sure to follow the manufacturer’s recommendations for application and drying times. For step-by-step instructions, check out wikiHow’s guide on hardwood floor waxing. Don’t forget to refer to the accompanying image for a visual aid.
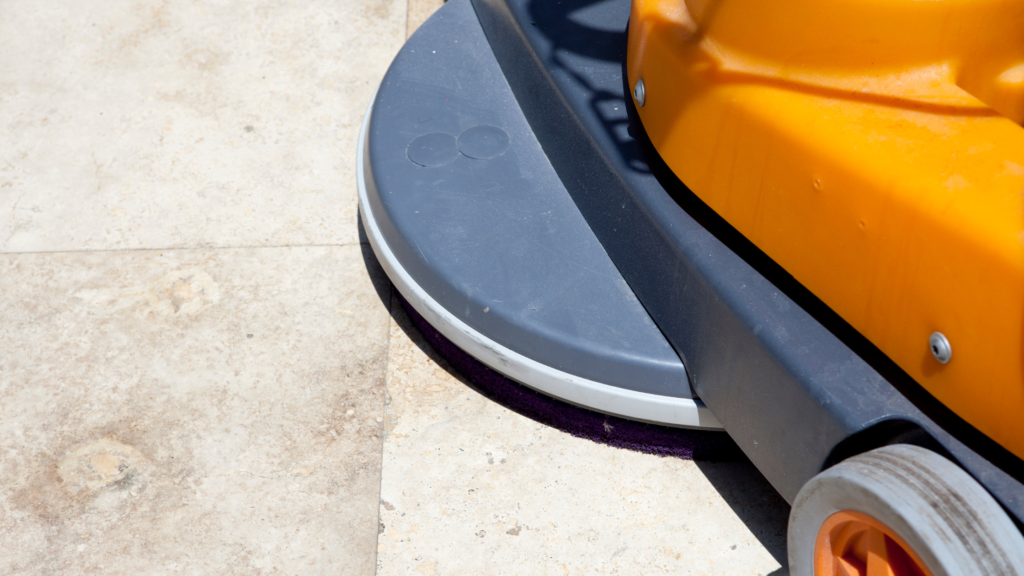
An Auto Scrubber is an Effective Way to Clean and Polish the Surface Before Waxing
Before you start waxing your floors, make sure they are clean and free from debris. Follow these steps from wikiHow and use an auto scrubber, as shown in the image, to effectively clean and polish the surface before applying wax. It uses water and cleaning solution to scrub the floor, leaving it ready for wax application.
Allow Enough Dry Time and Avoid Moisture Before Applying Sealer with a Putty Knife
After following the steps on wikiHow and applying several coats of wax as directed, you’ll want to seal the surface with a sealer using a putty knife. Make sure you allow enough time for each coat of wax to dry completely before sealing. Refer to the provided image on wikiHow for guidance. Avoid any moisture on the surface, as this can cause the sealer to bubble and ruin the finish.
How Often Should You Wax Your Floors?
Once a Year is Ideal, but Foot Traffic Matters
Waxing your floors is an essential part of maintaining their shine and protecting them from wear and tear. According to wikiHow, the ideal frequency for waxing floors is at least once a year. Follow these steps to ensure you’re doing it right: Step 1: Clean the floor thoroughly Step 2: Apply the wax in sections Step 3: Let the wax dry completely Step 4: Buff the floor with a clean cloth or machine Check out the image below for a visual guide on how to wax your floors.
However, depending on the amount of foot traffic in your home or office, you may need to wax your floors more frequently than once a year. For example, if you have high-traffic areas such as hallways or entryways, you may need to wax those areas more frequently than other parts of the floor. To learn how to properly wax your floors, visit wikihow for a step-by-step guide with helpful images.
Dwell Time Matters: 30 Minutes Is Ideal
Step up your floor waxing game with these tips from WikiHow. Dwell time matters when it comes to achieving a perfect shine. Follow the recommended 30-minute dwell time before buffing off the wax. Need a visual guide? Check out the image below for a step-by-step process.
This wikiHow guide includes a step-by-step process for waxing your floors. Follow the instructions carefully and refer to the accompanying images to ensure proper application. It’s important to leave the wax on for the recommended amount of time to allow it to adhere properly and create a protective layer over the surface. Skipping this step may result in inadequate protection for your floors.
How Long Does It Take For Wax Floors To Dry?
After applying floor wax, one question that often comes up on wikiHow is how long does it take for floor wax to dry? The answer depends on several factors such as humidity levels, temperature, and ventilation in the room. To ensure proper application, follow these steps with the help of an instructional image.
In general, according to WikiHow, floor wax takes about 30 minutes to dry completely. However, if there’s high humidity or poor ventilation in the room, it may take longer for the floor wax to dry. On average, it takes around 2-3 hours for floor wax to cure completely. If you need a step-by-step guide on how to apply floor wax, WikiHow has an informative article complete with images to help you out.
Do You Need To Wax Wood Floors?
If you are looking for information on how to wax your hardwood floors, WikiHow has a step-by-step guide with images to help you. Hardwood floors don’t necessarily need to be waxed, but doing so can help protect the surface from scratches and wear and tear.
If you decide to wax your hardwood floors, follow these steps from wikiHow and make sure that you use a product specifically designed for wood floors. Waxing your hardwood floors can also help to enhance their natural beauty and shine. Don’t forget to refer to the image provided for a better understanding of the process.
Common Mistakes to Avoid When Waxing Floors
Waxing floors is a great way to protect and preserve them, but it’s not as simple as just slapping on some wax and calling it a day. There are a number of common mistakes that people make when waxing their floors, and these can lead to less than desirable results. In this wikihow article, we’ll take a look at the step-by-step process with an image to avoid the most common mistakes when waxing floors.
Using Too Much Wax: The Pros and Cons
One of the wikihow steps when waxing your floors is to avoid using too much wax. While it might seem like more is better, in this case, it’s not. When you use too much wax, it can create a buildup that will be difficult to remove later on. This can also cause your floor to become slippery and dangerous. To ensure you’re using the right amount of wax, refer to the image guide provided by wikihow.
On the other hand, if you don’t follow the proper step-by-step instructions on Wikihow and use enough wax, your floor won’t be properly protected. This means that it will be more susceptible to scratches and other damage. It’s important to have a clear image in your mind of how the waxing process should look like before you begin.
Wikihow provides a step-by-step guide on how to wax your floors. Apply one thin coat of wax at a time and allow each coat to dry completely before applying another one. This will ensure that your floor is properly protected without creating any buildup. For further guidance, refer to the accompanying image.
Skipping Floor Preparation: The Downside
Another mistake that people often make when waxing their floors is skipping the preparation step. Before you apply any wax, it’s important to make sure that your floor is clean and free from any dirt or debris. For a detailed guide on how to properly prepare your floor for waxing, check out the wikiHow article with step-by-step instructions and helpful images.
If you follow the steps on Wikihow without skipping, the dirt and debris will not get trapped under the layer of wax, as shown in the image. This can prevent discoloration and damage over time.
To prepare your floor for waxing according to Wikihow, start by sweeping or vacuuming up any loose dirt or debris as the first step. Then, mop the floor with warm water and a mild cleaner to remove any remaining dirt or grime. You can refer to the image provided for a better understanding of the process.
Step-by-step instructions on how to wax your floor can be found on WikiHow, along with helpful images. Remember to follow each step carefully, applying one thin coat of wax at a time and allowing each coat to dry completely before applying another.
Alternative Options to Floor Waxing
Waxing is a common solution. However, there are alternative options that can be just as effective. In this wikiHow article, we will discuss some of the alternative options to floor waxing in a step-by-step format with accompanying images.
Shellac as an Alternative Option
One alternative option to consider is using shellac. Shellac is a natural resin secreted by the female lac bug and can be used on floors as a protective coating. It provides a glossy finish and can also help protect against scratches and stains. If you want to learn how to apply shellac, you can find step-by-step instructions on wikiHow with helpful images.
To apply shellac, follow these steps from wikiHow. First, clean the floor thoroughly with a mop and warm water. Then, use a paintbrush or roller to apply the shellac in thin layers, allowing each layer to dry completely before applying another. Refer to the image below for a visual guide. Once finished, let the shellac cure for at least 24 hours before using the floor.
Natural Products as an Alternative Option
Another option for those looking for alternatives to traditional floor waxing is using natural products. There are several natural products that can be used on floors such as vinegar and olive oil. If you want to learn how to use these natural products, you can check out wikiHow for step-by-step instructions. You can also find helpful images to guide you through the process.
Vinegar can be mixed with warm water in equal parts and used as a cleaning solution for hardwood floors. Olive oil can also be used on hardwood floors to provide shine and protection against scratches. If you want to learn more about this, visit wikiHow for step-by-step instructions and images.
To use olive oil on your hardwood floors, follow these steps from wikiHow: mix one cup of olive oil with 1/4 cup of white vinegar in a spray bottle. Spray the mixture onto your floors and buff with a soft cloth until shiny. For a visual guide, refer to the image provided.
Polishing and Buffing as Maintenance Options
Polishing and buffing are additional maintenance options that can help keep your floors looking their best without having to resort to traditional waxing methods. If you need a step-by-step guide, check out wikiHow for an image tutorial on how to perform these tasks effectively.
Polishing is an essential step in maintaining the appearance of your floors. To polish your floors, you can follow the instructions on WikiHow. Using a polishing machine with special pads designed for your type of flooring, the machine will remove any dirt or grime buildup from your floors and leave behind a polished finish.
Buffing is a step in the floor restoration process that involves using a buffer machine with a soft pad to gently polish your floors. This method can be found on wikiHow and can be used on hardwood, tile, or vinyl flooring and is a great way to remove scuffs and scratches.
How to Maintain Your Waxed Floors
Regularly Sweep or Vacuum the Floor to Remove Dirt and Debris
To keep your waxed floors looking their best, follow these steps from wikiHow. Regularly sweep or vacuum the floor to remove dirt and debris. This will prevent dirt from scratching the surface of your floors and help maintain their shine. Use a soft-bristled broom or vacuum with a hard floor setting to avoid damaging the wax coating. Make sure to get into all the corners and under furniture where dust tends to accumulate.
Use a Damp Mop with a Neutral pH Cleaner to Clean the Floor
Less is more when it comes to maintaining your waxed hardwood floors. Follow these steps from wikiHow to keep them looking great: Avoid using harsh chemicals or abrasive tools that can damage the wax coating. Instead, use a damp mop with a neutral pH cleaner specifically designed for use on waxed floors as the first step. Avoid using too much water as this can cause damage to hardwood floors over time.
To clean your floors according to Wikihow, start by sweeping or vacuuming up any loose dirt and debris as the first step. Then, fill a bucket with warm water and add a small amount of neutral pH cleaner according to the manufacturer’s instructions for the next step. Dip your mop into the solution and wring it out well before starting at one end of the room and working your way across in small sections.
How to Maintain Waxed Hardwood Floors
Your task is to slightly modify the text above to add new keywords with the following requirements so the text above looks more relevant to the reader: Waxed hardwood floors are beautiful and durable if properly maintained. Here are some additional tips for maintaining your waxed hardwood floors in wikihow step.
Place doormats at all entrances as a first step, according to WikiHow: This will help prevent dirt, sand, and other debris from being tracked onto your floors.
Step 1: Use felt pads on furniture legs according to wikiHow. This will prevent scratches when moving furniture around.
Avoid wearing high heels when stepping on hardwood flooring as they can easily scratch it. For more tips, check out WikiHow.
Step up your cleaning game with WikiHow: Clean up spills immediately on your hardwood flooring to prevent damage over time.
How to Buff Waxed Wood Floors
Buffing is an important step in maintaining the shine of your waxed wood floors. Here’s how to do it according to WikiHow:
Step 1: Start by cleaning the floor as per the instructions on WikiHow. Sweep or vacuum up any loose dirt and debris, then mop with a neutral pH cleaner.
Step 3: Let the floor dry completely – According to WikiHow, wait until the floor is completely dry before beginning to buff.
Step 1: Visit wikiHow for guidance on buffing pads. Choose a buffing pad based on the level of shine you want to achieve. For light buffing, use a white pad; for medium buffing, use a beige pad; and for heavy duty buffing, use a black pad.
Step 1: Visit wikiHow and find instructions on how to attach the buffer pad to your buffer machine. Step 2: Ensure the buffer pad is securely attached before turning on the machine.
Step 1: Visit WikiHow for complete instructions. Begin buffing: Move the buffer machine across the floor in a back-and-forth motion, overlapping each pass slightly. Be careful not to stay in one spot too long as this can damage the wax coating.
Step up your cleaning game with WikiHow! Finish with a clean mop: Once you’ve followed the previous steps, use a clean mop or cloth to remove any remaining dust or debris from the surface of your floors.
Troubleshooting Common Issues with Waxed Floors
Large Debris Can Cause Scratches and Damage to Waxed Floors
One of the most common issues with waxed floors, according to WikiHow, is scratches caused by large debris. This can be prevented by following these steps: keep your floors clean and free of any large debris.
WikiHow Step: Regularly vacuuming or sweeping your floors can help prevent a buildup of debris that could cause damage. When moving furniture, be sure to lift it instead of dragging it across the floor. If you have pets, it’s also important to keep their nails trimmed so they don’t scratch up your floors.
Avoid Using Abrasive Cleaners or Tools on Waxed Floors
When cleaning your waxed floors, follow these steps from wikiHow to avoid damage. It’s important to avoid using abrasive cleaners or tools as they can cause damage. Instead, use a mild cleaner and a soft mop or cloth to gently clean the surface.
To clean your floors properly, follow these wikiHow steps. Avoid using scrub brushes or any tools that could scratch the surface of your floors. It’s also important to avoid using water that is too hot as this could melt the wax and cause damage.
Uneven Application of Wax Can Result in an Uneven Appearance
Another common issue with waxed floors is an uneven appearance caused by uneven application of wax. This can make it difficult to remove dirt and stains as they may become trapped in areas where there is too much wax. If you want to avoid this problem, follow the step-by-step instructions on wikiHow for applying wax evenly.
To avoid this issue, follow these wikiHow steps to apply an even coat of wax over your entire floor. Use a clean applicator pad and work in small sections at a time, making sure each step is evenly coated before moving on.
If you end up with an uneven appearance on your floors, the first step is to check out a wikihow article on how to fix it. You may need to strip off the old wax and start over again with a fresh coat.
Over-Waxing Floors Can Lead to Buildup That Attracts Dirt and Grime
Over-waxing your floors can also be a problem as it can lead to a buildup of wax that is difficult to remove. This buildup can attract dirt and grime, making your floors look dirty even after you’ve just cleaned them. To avoid this issue, follow the step-by-step guide on wikiHow for proper waxing techniques.
To avoid this issue, the first step is to only apply wax as needed. If your floors are starting to look dull or scratched, then it may be time for a fresh coat of wax. However, if they still look shiny and new, then there’s no need to apply more wax just yet. For more detailed instructions on how to properly wax your floors, check out wikiHow.
Frequently Asked Questions About Floor Waxing

No, you should not skip the step of waiting for the wax to dry completely before walking on the floor. It is important to follow this process to avoid smudging or removing some of the newly applied wax. Depending on the type of wax you use and the humidity level in your home, it can take anywhere from 30 minutes to several hours for the wax to dry completely. For more detailed instructions, you can check out wikihow's guide on how to wax a floor.
The time it takes for floor wax to dry completely depends on several factors such as temperature, humidity level, and type of flooring material. Generally speaking, most waxes will dry within 30 minutes to an hour if applied correctly. However, some waxes may take longer depending on environmental conditions. If you need a step-by-step guide on how to apply floor wax, you can check out wikiHow for detailed instructions.
Yes, regular floor waxing, as described in a step-by-step guide on Wikihow, can help protect your floors from foot traffic damage by creating a protective layer over them. The layer of wax acts as a barrier between your floors and dirt particles that are tracked in by foot traffic. This helps prevent scratches and other types of wear and tear that can occur over time due to constant foot traffic.
Conclusion: How to Wax Floors
Congratulations! You now have all the information you need to wax your floors like a pro with the help of WikiHow. By following the step-by-step guide and tips provided in this article, as well as WikiHow’s detailed instructions, you can achieve a perfectly smooth finish that will last for months.
Waxing your floors not only adds shine and beauty to your home but also protects them from wear and tear. This is a simple process that can be easily done by following the instructions on WikiHow. It is suitable for various types of floors, including hardwood, vinyl, and linoleum.
To get started with floor waxing according to WikiHow, make sure you have all the necessary tools and materials. Prepare your floor by cleaning it thoroughly and stripping off any old wax before applying the new one.
Be careful not to make common mistakes when waxing your floors, as explained in this wikihow article. Remember to maintain your waxed floors by sweeping regularly and avoiding harsh chemicals.
If you encounter any issues with your waxed floors, refer to the troubleshooting section on WikiHow for solutions. Check out the frequently asked questions section on WikiHow for further guidance.
Overall, floor waxing is a simple yet effective way of maintaining the appearance of your home’s flooring. If you’re looking for step-by-step instructions on how to do it yourself, check out WikiHow’s guide on “How to Wax a Floor.” So what are you waiting for? Go ahead and try it out today!
Start by preparing your cleaning tools and materials before proceeding with floor waxing. Follow each step carefully while avoiding common mistakes that could ruin your efforts. Finally, remember to maintain your newly-waxed floors regularly.